

Crushed Opal can be used for many different types projects. Discover your next obsession with us through the fascinating world of Resin Jewelry!
Featured Creator
@liquideyesart
Follow @liquideyesart on Instagram or Checkout Liquid Eyes Art Etsy Shop
The Process Explained by Liquid Eyes Art
🦋 "First, I choose a mold with an engraved design. I use the engravings as guidelines to know where to place the opals. If I plan to do a combination of adding powder pigments along with the opals, I brush that on in the preparation stage. For this project, I only used opals so there was no need to prepare the mold beforehand. I did, however, do a quick color "sketch" to figure out exactly where I wanted to place each opal color."
🦋 "When its time to start, I mix up a very small amount of resin. I add about a drop of it in a separate container which I use to lightly coat the opals. I work with one opal color at a time and in very small quantities to ensure that I wont overestimate how much I really need. I then use a metal "toothpick" or tiny metal "spatula" to carefully pick up and add the opals into the mold."

🦋 "Once all the opals are in the mold I wait about 3-4 hours before coming back to fill the entire mold in with resin. If you wait this amount of time before pouring in the "filling" you will give the resin coating the opals in the mold time to harden lightly causing it to anchor them down. This way the opals wont float away when you fill the mold."
🦋 "When the resin has hardened (more or less 24 hours later) I demold the earrings and get to work filling in the engraving design with acrylic paint. This can be a long process because it requires you to constantly brush on paint and wipe off any of the excess, and repeat the process if necessary. Afterwards I add another topcoat of resin to seal in the paint."
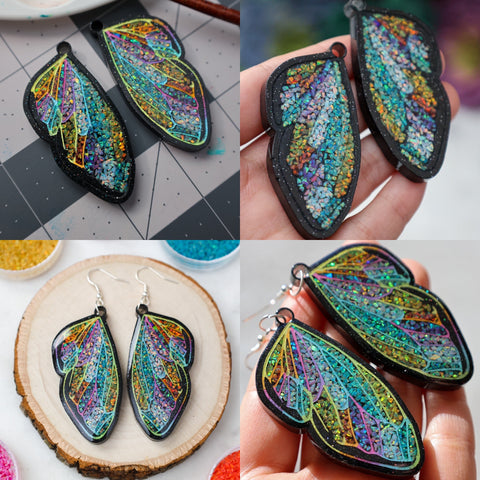
🦋 "Once the topcoat has dried I might lightly sand the bottom edges if needed to make sure the earring isn't sharp to hold. Then I add earring hardware using basic plier tools designed for making jewelry. Once you add the earring hooks you are finished and can finally fully admire your creation! Enjoy!"
The Products:
- Crushed Opal Materials-
- Project Materials -
Acrylic Pant
- Tools -
Tiny Metal Spatula
Sand Paper
Pliers
FOLLOW US TO UNLOCK YOUR NEXT PASSION PROJECT
@theopaldealer


